Using notebook with .Net Spark engine in Azure Synapse
While attending an Openhack on Data wharehouse, we decided to go with Azure Synapse Analytics, still in preview as in September 2020, to manage our entire data processing:
- Centralize data from various sources into a data lake,
- Aggregate data of same type into one,
- Build a star schema from this data,
- Export it into SQL Server to analyse it via PowerBI.
In the old days, it would have required several different tools to complete all of these steps. But today, Azure Synapse Analytics is one tool to rule them all …
The purpose of this post is not to show big data (mostly because it is not my job role and I would not be pertinent) but to show how a developer such as myself, who literally loves C#, can leverage that into the big data world.
What is Azure Synapse Analytics
From the official documentation, Azure Synapse Analytics is “one of Microsoft’s implementations of Apache Spark in the cloud […] Apache Spark being a parallel processing framework that supports in-memory processing to boost the performance of big-data analytic applications”.
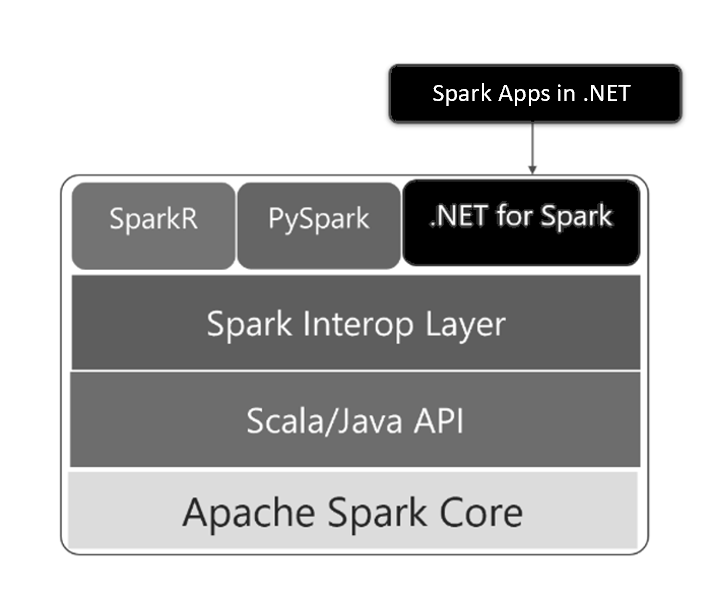
Why is it interesting? The reason is simple: Synapse introduces an extra layer on top of the big data framework Apache Spark in .NET. So yes, we can manipulate vast amount of data using the langagues we love : Scala, Python and now C#!
We can see below this high-level architecture of that implementation:

Use case
Just for a kick start in .NET Spark, let’s take a simple use case. I have a data lake that contains an input CSV file that lists movies. This data lake is an Azure Data Lake Storage Gen2 with a container called input in which the CSV file is stored:

This is a raw dataset that we want to clean and prepare for analysis. Here are the steps to clean up our data :
- Add a unique ID for our movies list,
- Extract subject into an external dataset, and store a subject ID instead in the main data set,
- Break actor and actress columns into an external dataset with a list of actors, both female and male,
- Add a mapping dataset actorsMovie to store the list of actors per movies,
- Finally, generate a movie dataset with IDs (this cleaning could also be done for Directors, but let’s skip that for now).
Let’s begin!
Create a .NET Spark notebook
[I assume here that you have an Azure subscription, and in this subscription, you have created an Azure Synapse Analytics resource].
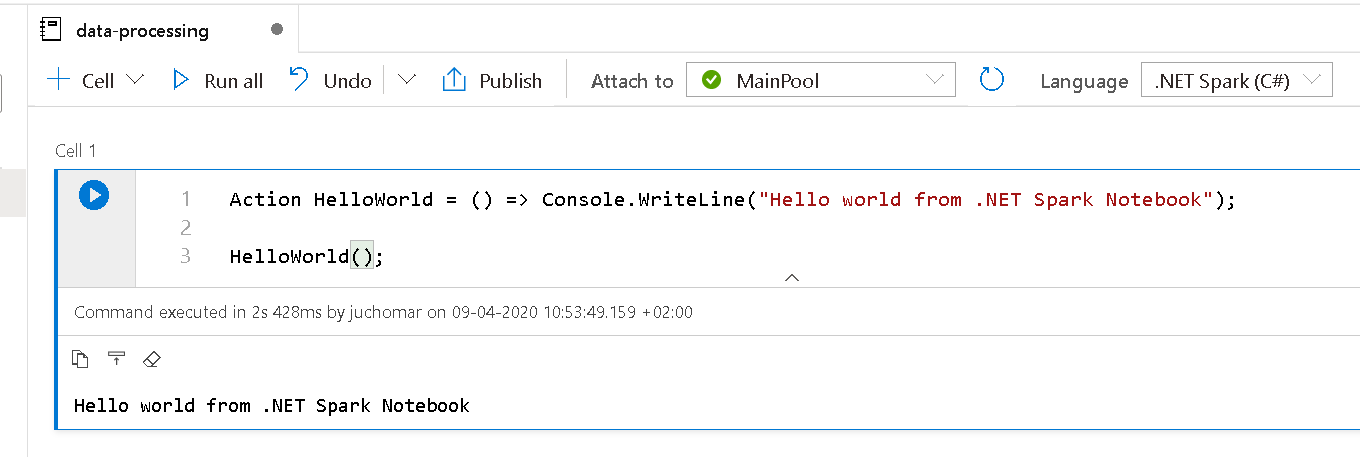
From the left menu, go to Develop and add a new notebook. To validate that .NET works, here is a small snippet:

We can see that the language is .NET Spark (C#) (top right corner) along with a very basic C# code inside the notebook. And of course, it works!
Load our source CSV into a data frame
First thing first, let’s add a new cell in our notebook to load the CSV file from the data lake into a data frame:
var accountName = "{Storage account}";
var containerName = "{Container}";
var file = "/movies-dataset.csv";

// Build the ADLS path to that file
var adlsInputPath = $"abfss://{containerName}@{accountName}.dfs.core.windows.net/{file}";
Make sure to adapt accountName, containerName and file variables. These variables will instruct Spark to go and get our source file from the data lake using the endpoint adlsInputPath.
Display in the notebook this source data
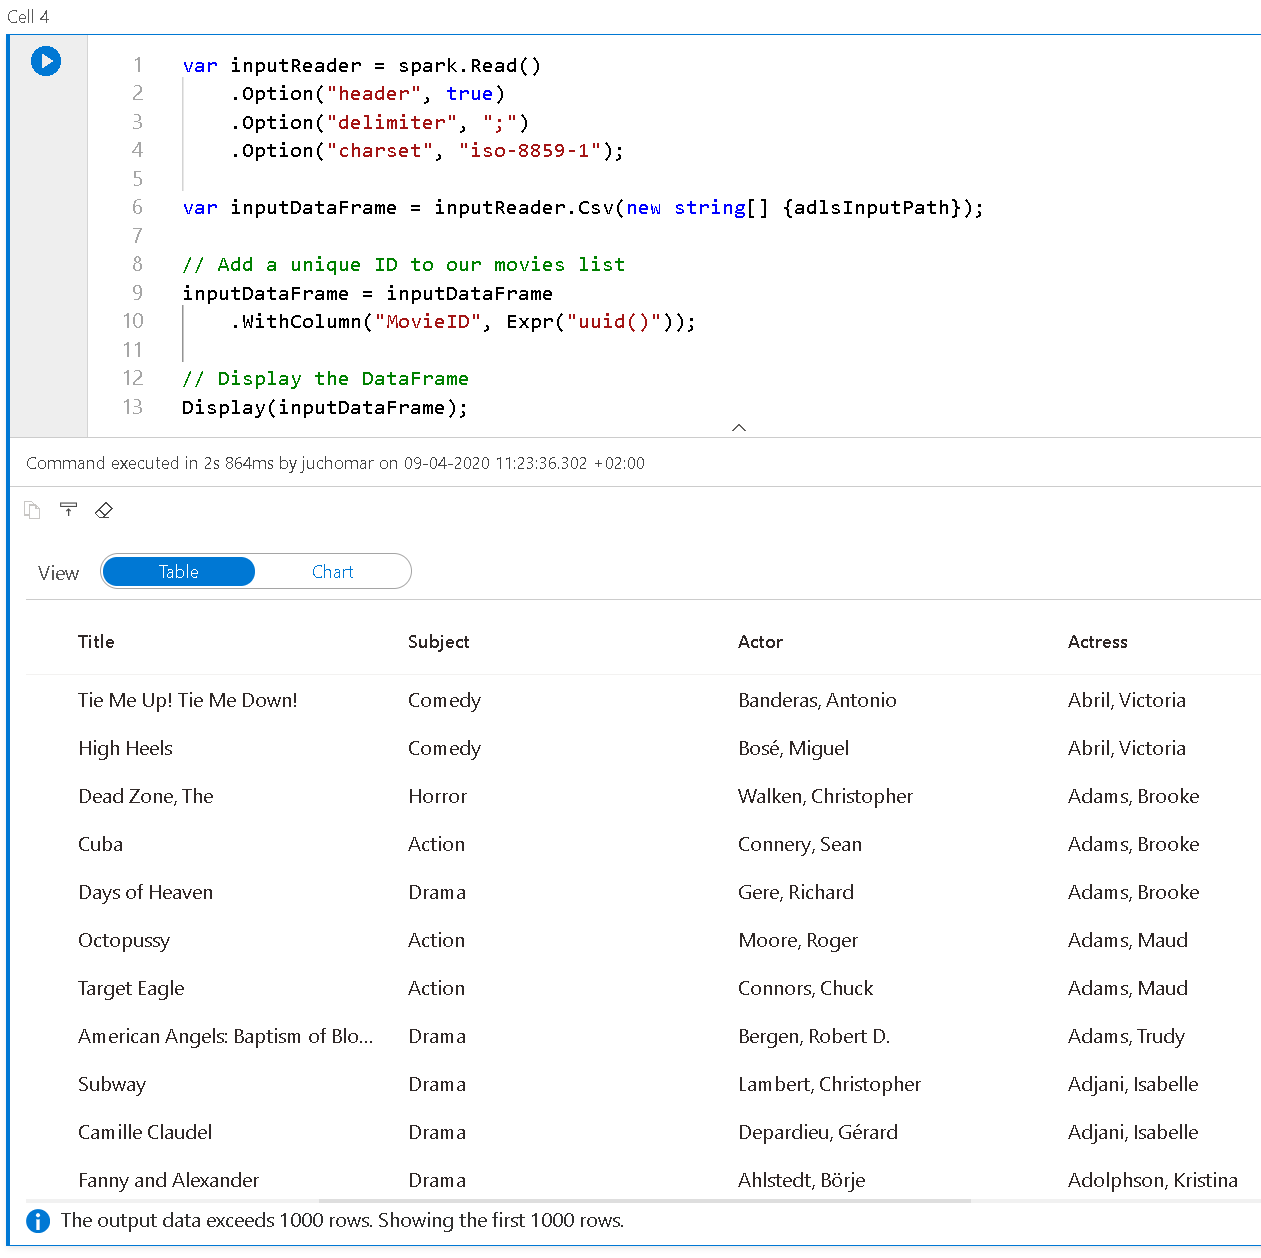
As we would do in Python or Scala, let’s show a table on the notebook with an extract of my CSV file:
var inputReader = spark.Read()
    .Option("header", true)
    .Option("delimiter", ";")
    .Option("charset", "iso-8859-1");

var inputDataFrame = inputReader.Csv(new string[] {adlsInputPath});

// Add a unique ID to our movies list
inputDataFrame = inputDataFrame
    .WithColumn("MovieID", Expr("uuid()"));

// Display the DataFrame
Display(inputDataFrame);
We first create a reader with a few options (presence of a header, delimimter and encoding).
We then add a new column do our data frame with a unique ID (because the source data did not have any) - and finally display this data frame using the function Display(). Executing the cell (or pressing CTRL+Return) will result in the following:

Extract dimensions into separate data frames
As we have discussed above, in our cleaning process, we want to extract dimensions from this main source file and only reference IDs. So, let’s extract Subject first.
In a new cell, let’s use the following code:
var subjectDataFrame = inputDataFrame
        .Select("Subject")
        .DropDuplicates()
        .Filter("Subject != ''")
        .WithColumn("SubjectID", Expr("uuid()"))
        .Select("SubjectID", "Subject").OrderBy("Subject");

// Display the DataFrame
Display(subjectDataFrame);
In the first 6 lignes, we select only Subject from the source data, remove duplicate and empty strings. We also add a column with a unique identifier - and we finally select the columns in the correct order and properly sorted out. We obtain a new data frame. We will deal with reinjecting the ID later, after exporting all our dimensions.
Note that, like PySpark (Python for Spark), we can chain our call: each method (Select(), Filter() returns a data frame object, so we can work directly on that output).
Let’s do the same procedure here with Actors. This dataset has 2 columns with the principal female and male actors. The idea here is to extract all these actors into a separate data frame with a unique ID. We will also need a link data frame to tell which movie has which actors. Below the tables to represent the final model we want:
- Actors
| ActorID | ActorName |
|---|---|
| 123 | Jane |
| 456 | John |
- ActorsMovie
| MovieID | ActorID |
|---|---|
| AAA | 123 |
| AAA | 456 |
Jane and John are actors of movie AAA
- Movies
| MovieID | Title | … |
|---|---|---|
| AAA | A great title | … |
The Movies data frame will contain nothing regadring actors as, because of the ID, we will be able to retreive the actors list.
To achieve that, the code is a little bit more complex than for subject, but still easily doable in C#:
var actorDataFrame = inputDataFrame
    .Select("Actor")
    .DropDuplicates()
    .Filter("Actor != ''")
    .Union(inputDataFrame.Select("Actress").DropDuplicates().Filter("Actress != ''"))
    .WithColumn("ActorID", Expr("uuid()"))
    .WithColumnRenamed("Actor", "ActorName")
    .Select("ActorID", "ActorName").OrderBy("ActorName");

Display(actorDataFrame);
We are using the method Union() here to aggregate a set of rows into one data frame (first list is the Actor selection and second one is Actress selection).
var actorsMovieDataFrame = inputDataFrame
    .Select("MovieID", "Actor")
    .Filter("Actor != ''")
    .Union(inputDataFrame.Select("MovieID", "Actress").Filter("Actress != ''"))
    .WithColumnRenamed("Actor", "ActorName")
    .Join(actorDataFrame, new string[] {"ActorName"}, "left")
    .Select("MovieID", "ActorID");

Display(actorsMovieDataFrame);
We are using here the same approach to generate our ActorsMovie data frame.
Optimize our Movie data frame
We have now extracted our dimensions (appart from Directors that we could have done also, but nothing new to learn here), let’s generate our Movies data frame by removing Subject, Actor, Actress and left joining SubjectID from the Subjects data frame
var moviesDataFrame = inputDataFrame
    .Join(subjectDataFrame, new string[] {"Subject"}, "left")
    .Select("MovieID", "Title", "Year", "Length", "SubjectID", "Director", "Awards")
    .OrderBy("Title");

Display(moviesDataFrame);
Save our processed data back to the data lake
We have done some (basic) data processing. We end up with four data frames in memory:
- Subject
- Actor
- ActorsMovie
- Movies
We need now to save that back into our data lake so that we can use PowerBI to analyse it. Of course, at this stage we only have dimensions tables and not fact tables (for a star schema), but again, the idea here is to show some C#.
We have several options to save our data frame: CSV, Parquet, json or directly into a SQL database. Let’s show a simple exemple with CSV:
// Destination
var containerOutput = "output";
var adlsPathOutput = $"abfss://{containerOutput}@{accountName}.dfs.core.windows.net/";

subjectDataFrame.Write().Mode(SaveMode.Overwrite).Option("header", true).Csv(adlsPathOutput + "subject");
actorDataFrame.Write().Mode(SaveMode.Overwrite).Option("header", true).Csv(adlsPathOutput + "actor");
//.. etc for the other data frames
We need to define our destination endpoint, in the same storage account but in a different container. Calling the Write() method on our data frame will return a DataFrameWriter object. This object has various methods to save in different formats. Above we call Csv() to save it in a Csv format.
To save in parquet format, we simply need to call the Parquet method instead of Csv one.
And finally, if we want to export this clean data into SQL Server, we can use T-SQL command
COPY INTO dbo.Subjects
FROM 'https://{Storage Account}.blob.core.windows.net/output/subject'
WITH  (
...
)
This command will connect to the blob storage (data lake) (credentials are passed in the With statement) and copied directly into SQL. This is one of the most efficient approach. To learn more about that, you can go there.
This command can be included into a pipeline process so that it occurs at the end of the notebook execution. And the beauty of Synapse is that you can do that diectly in Synapse!
Conclusion
In this post we haven’t learn anything in big data per sé, nor learn all the capabilities of Azure Synapse Analytics. We did see however how we can leverage our C#, and more generally .NET experience, into notebook for data processing. What we have noticed though is the objects used in C# are the same as for the other languages such as Python or Scala. That makes it easier to ramp up.
You can find additional resources below:
